What's inside the exposure triangle?
The benefit of manual exposure over an automatic one is consistency between shots. Manual overrides the camera’s metering system which is easily tricked by light reflected from the subject. A black cat or white snow will be forced to middle-gray unless you take control. The exposure triangle is an attempt to introduce the mechanics of manual exposures.
I’ll simplify the triangle to three line-relationships in this post, or you can forget about ISO completely as I explain in this post on simplifying exposure calculations.
The triangle
The exposure triangle explains the relationship between the exposure variables of ISO, aperture and shutter speed. It visually shows these three variables are related, but it is rare to see how a given resultant exposure plots in the triangle and what happens to that point as settings change. Look to the bottom of this post to brush up on how the exposure variables affect your image and what the full-stop values of each variable are. Oftentimes the diagram just has meaningless arrows guiding you in a circle, or telling you that the middle of the empty triangle is the “perfect” exposure. And when we add strobes to the mix, the triangle is no longer a useful tool at all. And where do you plot a 10-stop ND filter?
Google search for Exposure Triangles and you get a lot of empty shapes…
First things first, the exposure triangle (and light meter readings for that matter) provide a relationship between exposure variables, not a “correct exposure”. Correct exposure depends on the scene and is either artisticly subjective, or rigorously objective using something like the zone system. We talk about neither here.
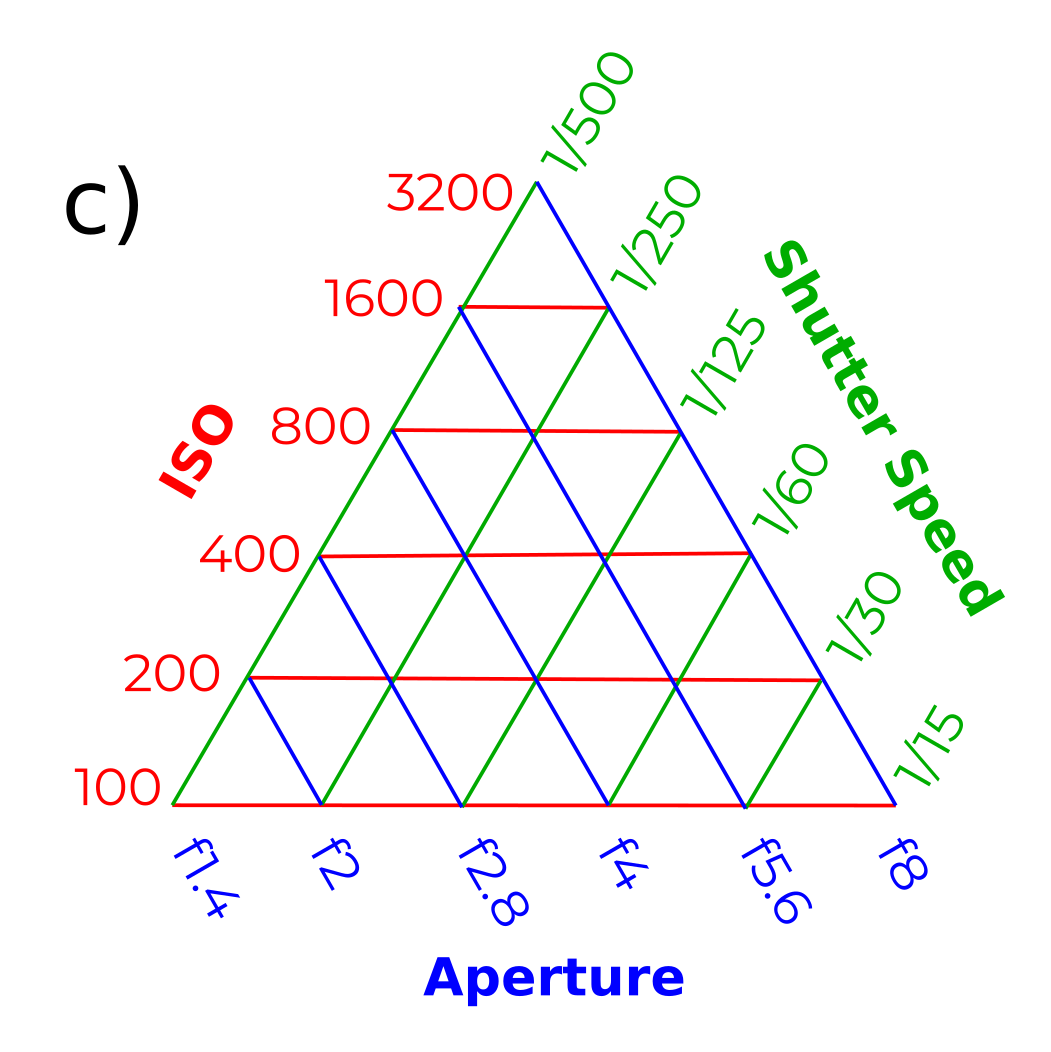
Second things second, when we use the triangle as a real ternary plot we see that it represents not a range of exposures, but only one resultant exposure. Below in Fig.1a we see that all intersecting points share the same exposure value, each point being a different combination of the exposure variables. We can explore the plot by moving along straight lines. As you move from point to point, you’ll find you will keep one variable constant, increase another variable by one stop of light, and decrease the last variable by one stop.
In Fig.1b (same base as Fig.1a) we start at “x” with ISO 400, 1/500th at f8. If we stay at f8, we can only move along the blue f8 line to somewhere like “y” where we loose 2 stops of light to get to ISO 100, but gain 2 stops with 1/125th of a second. Alternatively, if we stay at ISO 400 we can only move along the red ISO 400 line to somewhere like “z” where we loose 2 stops of light to get f16, and gain 2 stops with 1/125th of a second.
To get a darker or lighter final image you need to shift the range of values on an axis. In Fig.1c the aperture range is shifted to wider apertures. Compared to Fig.1a, every point is exactly 3 stops brighter. You could also shift the ISO or shutter speed axes, but the values already represent a range you would use in everyday situations.
Figure 1. Usable exposure triangles.
So the triangle is in fact a playground to explore the infinite ways to get the same resultant exposure.
From a triangle to three lines
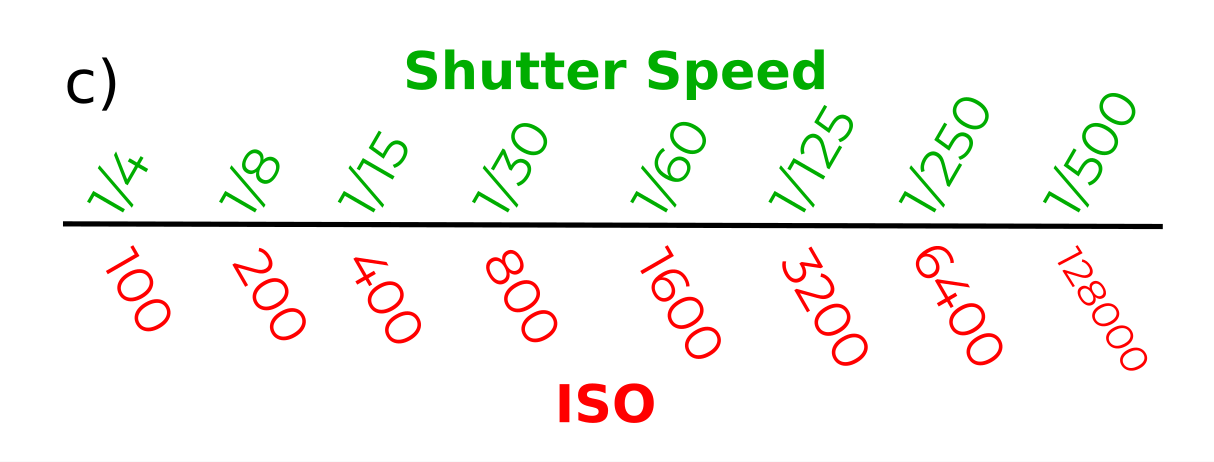
It is easier to think of the relationships as three separate linear plots, like in Fig.2. To maintain a certain exposure value, shutter speed increases with decreasing aperture (constant ISO), aperture needs to increase if ISO decreases (constant shutter speed), and ISO decreases with decreasing shutter speed (constant aperture). An action that increases exposure needs to be countered with an action that decreases exposure if the resultant exposure value is to remain constant. Just like in the triangles, each combination is reciprocal so they all give the same resultant exposure. You need to shift the values of one variable left or right in order to make your image lighter or darker.
Figure 2. Linear relationships between exposure variables.
Understanding how to maintain or change exposure is critical for a good image. Once this is internalized and second-nature, you can worry about more important things like ideas, light and interaction with your subject.
exposure variables quick reference
It’s useful to think in full stops (doubling and halving of light values) to further simplify the process. Half stops are overkill for most types of photography and third or tenth stops are for precise scientific, studio and product photography. For most people, using less than full stops are an illusion of precision that is not important for your images.
Shutter Speed
Slow shutter speeds (e.g. 1/15th, 1/30th) let in lots of light, but any movement of camera or subject might cause motion blur
Fast shutter speeds (e.g. 1/250th, 1/500th) doesn’t allow as much light to the sensor, but can freeze motion
Full stop speeds: 1s, 1/2s, 1/4s, 1/8s, 1/15th, 1/30th, 1/60th, 1/125th, 1/250th, 1/500th, 1/1000th.
Aperture
Wide apertures (e.g. f1.4, f2) have a narrow depth of field (blurred background) and lets in a lot of light
Narrow apertures (e.g. f11, f16) have a wide depth of field (lots in focus) and restricts light to the sensor
Full stop apertures: f1, f1.4, f2, f4, f5.6, f8, f11, f16, f22, f32
ISO
Low ISOs (e.g. 100, 200) are for high light levels and have minimal digital noise/film grain
High ISOs (e.g. 1600, 3200) are for low light conditions at the expense of more digital noise/film grain
Full stop ISOs: 100, 200, 400, 800, 1600, 3200, 6400


